
A table of contents makes it easy for the reader to go through your document. You may insert a table of contents in Word using the headers in your documents and then update it as you make changes to the page. Here is how.

Tip: Instructions in this article apply to Microsoft Word 2010, Microsoft Word 2013, Word 2016, Word 2019, Word 2021, Word 365, and Word for Mac. In this article, we are using Word for Microsoft 365 as an example.
How to Create Table of Contents in Word
Steps to insert a table of contents in Word.
Using a table of contents, regardless of the size of your Word document, helps bring the reader to exactly where they need to go.
A table of contents makes the document more reader-friendly. It also makes it easy for the writer to go back and add or remove the content as needed.
Microsoft Word generates a table of contents by default using the first three built-in heading styles (Heading 1, Heading 2, and Heading 3).
To use Heading Styles, click the Home tab, choose the particular style, and apply it. If you are unhappy with the available heading styles in Word, you can customize the default heading style.

You have two options for dealing with this. You can either apply heading styles to each section after you have completed the document or add them as you go.
After you have applied your heading styles, insert your table of contents.
The first step is to position the cursor where you want the table of contents to display. Then, select the References tab and click Table of Contents.

A drop-down dialog box will appear. You can choose from three different built-in tables, Automatic Table 1, Automatic Table 2, and Manual Table.

The sole distinction between Automatic Table 1 and Automatic Table 2 is their titles, labeled as Contents and Table of Contents, respectively. Selecting Automatic Table 1 or 2 will insert the table of contents using the heading names.

If you choose the Manual Table option from the Table of Contents drop-down box, it will add a template, and you must manually change it.

There are sub-levels in this table of contents, as you can see. In your Word document, each level represents a different heading style. So, if you choose the automatic table and wish to include sub-levels in your ToC, use Heading 1 for level 1, Heading 2 for level 2, and Heading 3 for level 3.
You can expand your table of contents beyond the first three heading styles. When you click the Table of Contents option, select the Custom Table of Contents from the drop-down list at the bottom.

Click Options in the Table of Contents window that appears.

In the Table of Contents Options dialog box, type the TOC level you want to use next to each possible style (these are built-in styles in Word beginning with Heading 4).
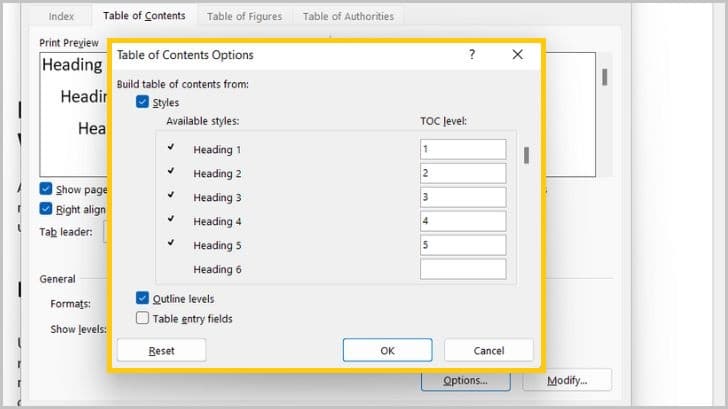
Once done, click OK.

How to Update Table of Contents in Word
If you need to add or remove a part from your document, update a table of contents to apply those changes.
Steps to update a table of contents in Word.
1. Select the table of contents you want to update.
2. Go to the References tab.

3. Click Update Table.

4. In the update table of contents pop-up window, select whether to “Update page numbers only” or “Update entire table.”

5. To save the changes, click OK.

Doing this will update your table of contents. It comes in handy when you need to add or delete a heading from the table of contents.
Note: Word cannot update manually created tables. To update manually created tables, type your changes manually in the table of contents.
How to Remove the Table of Contents in Word
It is easy to delete a table of contents in Word. Here is how.
1. Select the table of contents you want to remove.

2. Click the drop-down arrow on the left menu that appears.
3. Select “Remove Table of Contents” from the drop-down window at the bottom.

Your table of contents is removed from your document.