
Did you ever type a sentence and realize you should have capitalized it differently?
Instead of retyping the sentence or a word, you can easily change the case of any text in Microsoft Word without retyping it.
What to Know
- To change case, select any word or text in your document.
- Click Home > Change case in the Font group.
- In the drop-down, select any text case (Sentence case, lowercase, UPPERCASE, Capitalize Each Word, tOGGLE cASE).
It happens so frequently that I type a sentence in a Word document only to realize I used the wrong case.
It also happens if you turn the caps lock on or something else.
You don’t have to start over because Microsoft Word allows you to change the text case.
Note: The instructions in this article apply to Word 365, Word 2021, Word 2019, Word 2016, Word 2013, Word 2010, and Word for Mac. In our case, we’re using Word 365 as an example.
How to Change Case in Word
In this blog, I’ll show you three methods to change case in Word:
Follow the steps to change the case in MS Word using the Ribbon Menu, Keyboard Shortcut, and Word Online.
Let’s get to it!
Method 1: Change Case in Word Using the Ribbon Menu
Step 1: Open the Word document.
Open the document where you want to change the text case.
Step 2: Select the text.
Select the text you wish to change.
- To highlight a word, double-click on it.
- To highlight a sentence, click at the start of the sentence. Hold the left mouse button and drag the mouse cursor to the end of the text.
Let go of the cursor.
Step 3: Change the text case.
Select the Home tab from the menu bar.
From the Font group, click the Change Case drop-down arrow.
Note: The Change Case icon has an uppercase (A) and a lowercase (a).
Tip: Hover your cursor over the icons to see what they mean.
A drop-down menu will appear with five selection cases:
Here’s what the Change Case options mean:
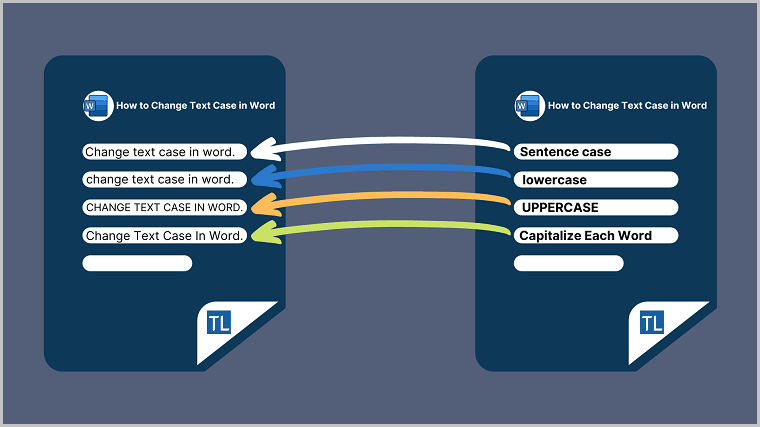
- Sentence case — Capitalize the first letter of each sentence and leave the rest in lowercase.
- lowercase — Exclude all upper case letters from the text.
- UPPERCASE — Capitalize all letters in the text.
- Capitalize Each Word — Capitalize the first letter of each word and leave the rest letters lowercase.
- tOGGLE cASE — Toggles between two case views. The first letter is either capitalized, and the rest are not, or the first letter is not in caps, and the rest are.
Click on the appropriate selection.
As seen in the image below, we changed the text from UPPERCASE to lowercase.
Method 2: Shortcut to Change Case in Word
Using the SHIFT+F3 Keyboard Shortcut
Step 1: Open the Word document
Open the document where you wish to change the text case.
Step 2: Select the text.
Highlight the text you want to change by clicking at the beginning of the sentence. Hold down the left mouse button, and drag the cursor to the end of the text.
Release the cursor.
Step 3: Change the text case.
Press and hold the SHIFT key down, and keep pressing the F3 (function) key on your keyboard.
The selected text will shift between all the text cases.
When you reach your desired text case, stop.
Here’s what our example sentence looks like:
Using the ALT+H Keyboard Shortcut
Step 1: Open the Word document.
Open the Word document where you want to change the text case.
Step 2: Select the text.
To highlight the text, click at the beginning of the word or sentence.
Then, hold down the left mouse button, and drag the cursor across the text.
Let go of the mouse.
Step 3: Change the text case.
Press the ALT+H shortcut keys on your keyboard.
It will select the Home tab and display the assignment of keys in the menu bar.
On your keyboard, press the number 7 key.
It opens a drop-down list with five selection cases:
- Sentence case — Press S to select Sentence case.
- lowercase — Press L for lowercase.
- UPPERCASE — Press U for UPPERCASE.
- Capitalize Each Word — Press C to choose Capitalize Each Word.
- tOGGLE cASE — Press T to select tOGGLE cASE.
Press the relevant key on your keyboard to select the text case you want.
Here’s what our example sentence looks like:
Method 3: Using Word Online
If you don’t have the MS Word desktop application installed on your computer, you can use Word for the web to change the case of the text. Here’s how.
- Navigate to the Office Online website and click the “Sign up for free” button.
- Create a free account to access Word online.
- Upload your document to the Word web app.
- Once your document opens, highlight the text you want to change.
- From the Home tab, click More Font Options > Change case.
- Select the text case from the drop-down list.
Conclusion
We have shown you three easy ways to change case in Word. Keyboard shortcuts are helpful for quickly correcting minor typing errors.
But, if you cannot remember all the keyboard shortcuts, knowing where to change things via the toolbar menu is simple.
The easiest way to change sentence cases in Word is to use keyboard shortcut keys. Select the sentence you want to change and keep pressing the SHIFT+F3 key. When the text changes to the case of your choice, stop.
To change lowercase to uppercase in Word. Select the text you want to change, and keep pressing the SHIFT+F3 key on your keyboard. Stop when your text changes to uppercase. Repeat the same steps to switch from uppercase to lowercase text.
To change your text to sentence case in Word. Highlight the sentence you wish to change. Select the Home tab, click the Change Case icon, and choose Sentence Case from the drop-down list.
