
Learn how to update to the latest version of Microsoft Office on Windows 10, 11, and macOS

Software updates are critical for keeping your applications updated with the most recent features, performance enhancements, and security patches.
Microsoft regularly releases updates for its Office suite. Check for, and install if Office updates are available using the steps below.
Note: While we use Microsoft Excel in this example, you can start updating Microsoft Office through any of its applications.
Turn on Automatic Updates
By default, Microsoft automatically updates Office applications to keep them up to date. This feature, however, can be turned off. If you have disabled automatic updates, we recommend enabling it again to have the most recent available version.
Enable Automatic Updates on Windows

To enable automatic updates for Microsoft Office on Windows, open Excel and click the “File” tab.

Next, at the bottom of the left-hand pane, select “Account.”

If you disable automatic updates, you’ll see a message under “Office Updates” that says, “Office will not update this product.” On the left, click the “Update Options” button.

Select “Enable Updates” from the drop-down menu that appears.
Microsoft Office will now receive updates automatically with each new release.
Enable Automatic Updates on Mac

To enable automatic updates for Microsoft Office on a Mac, open Excel and click the “Help” tab at the top of the system menu bar (not the Excel menu bar).

Select “Check for Updates” from the drop-down menu that appears.

A new window titled “Microsoft AutoUpdate” will appear. Automatic updates are disabled if the “Manually Check” option is selected. Select Automatically Download And Install.
Microsoft Office will now update automatically with each new release.
Note: Want to keep Microsoft 365 (Office) apps up to date automatically, check my guide about Microsoft Office update Mac.
RELATED: How to Update Microsoft Office on Mac Automatically
Manually Check for and Install Office Updates
If you want to disable Automatic Updates, you’ll have to manually check for Office updates and install any updates that Microsoft Office brings.
Manually Check for and Install Office Updates on Windows
Here’s how to manually check for Office updates and update Microsoft Office for Windows.

Open Excel and click the “File” tab near the top left corner.

Next, click “Account” near the bottom of the left pane.

Select “Update Options” next to “Office Updates.”
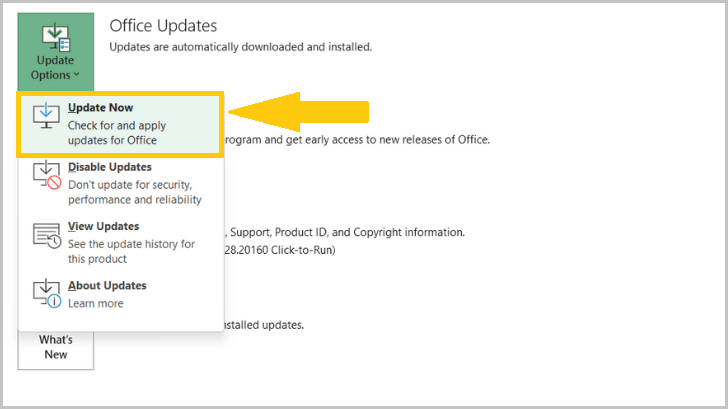
Click “Update Now” from the drop-down menu that appears.
- This option will not appear if you have disabled updates. If this is the case, click “Enable Updates” first and then “Update Now.”

Microsoft will now check for, install, and apply updates.

Once installed, you’ll see a message indicating your Office is up-to-date.
Manually Check for and Install Office Updates on Mac
Here’s how to manually check for Office updates and update Microsoft Office for Mac.

Open Excel from the Dock or Launchpad.

Click the “Help” tab from the top system menu bar. Again, this isn’t from the Microsoft Excel menu bar.

Click “Check for Updates” from the drop-down menu that appears, and it will open the Microsoft AutoUpdate tool.

Click the “Check for Updates” button in the bottom-right corner of the “Microsoft AutoUpdate” window.

Microsoft Office will now check and notify you if an update is available. Depending on how many Office apps you need to update, downloading and installing these updates may take some time.

Microsoft Office will notify you when the update is complete. You’ll see a message saying, “All apps are up-to-date.”
Open any Office app on Windows, such as Excel, and click File > Update Options > Update Now.
On Mac, open an Office app such as Excel, and in the top menu, select Help > Check for Updates. Then choose Automatically keep Microsoft Apps up to date. Click the Update button to install all the available updates.
